Module 1: Robot Pose
Normalized angles
When writing software to control a mobile robot, it is extremely important
to represent the robot’s pose. The pose is typically modeled as a triple:
its x and y coordinates, as well as its heading, represented in
radians. Because of the heading, we will be working with angles a great deal.
Thus, it is useful to write some functions to help with handling them.
Examine each pair of angles in radians. Which ones are the same angle?
- 0, 2 π
- 0, π
- -π, π
- π/4, 3π/4
- π/4, 5π/4
- π/4, 7π/4
- π/4, 9π/4
Because, for any given angle, there are an infinite number of possible
representations, we want to normalize angles to fall in a particular
range. There are two such ranges that are useful for our purposes:
- Positive angles in the interval [0, 2π)
- For every pair of angles, there are two possible distances between
them.
- By normalizing to the positive interval, we can determine which distance
is smaller and which is larger.
- Symmetric angles in the interval (-π, π]
- As we want 0 radians to represent going straight, by using positive
and negative radians we can represent different turn directions.
Read the Python program below. The function normalize_angle_positive()
needs to return an angle in the interval (-π, π]. The function
normalize_angle_symmetric() needs to return an angle in the interval
(-π, π]. The provided unit tests check to make sure they have these
properties.
Copy this code into a Python editor. Save it in a file entitled
robot_pose.py. Implement solutions to normalize_angle_positive() and
normalize_angle_symmetric() that pass the unit tests. It may be a useful
strategy to implement normalize_angle_positive() first and call it as
part of the implementation of normalize_angle_symmetric().
import unittest, math


def normalize_angle_positive(angle: float) -> float:
    """
    Ensure that the angle in radians lies between 0 and 2 * math.pi
    """
    pass


def normalize_angle_symmetric(angle: float) -> float:
    """
    Ensure that the angle in radians lies between -math.pi and math.pi
    """
    pass


class AngleMathTest(unittest.TestCase):
    def test_normalize_angle_positive(self):
        for theta, normed in [
            (-math.pi, math.pi),
            (-math.pi/2, 3/2 * math.pi),
            (-3/4 * math.pi, 5/4 * math.pi),
            (-7/8 * math.pi, 9/8 * math.pi),
            (2 * math.pi, 0.0),
            (3/2 * math.pi, 3/2 * math.pi),
            (9 * math.pi, math.pi),
            (-3 * math.pi, math.pi),
            (5/2 * math.pi, math.pi/2),
        ]:
            self.assertEqual(normed, normalize_angle_positive(theta))

    def test_normalize_angle_symmetric(self):
        for theta, normed in [
            (-math.pi, math.pi),
            (2 * math.pi, 0.0),
            (3/2 * math.pi, -math.pi/2),
            (9 * math.pi, math.pi),
            (-3 * math.pi, math.pi),
            (5/2 * math.pi, math.pi/2),
        ]:
            self.assertEqual(normed, normalize_angle_symmetric(theta))


if __name__ == '__main__':
    unittest.main()
Representing robot pose using a Python class
Read the partial class definition below. Then add it to robot_pose.py.
class RobotPose:
    """
    Represents a robot pose (x, y, theta)
    theta should always be normalized
    """
    def __init__(self, x: float, y: float, theta: float):
        self.x = x
        self.y = y
        self.theta = normalize_angle_symmetric(theta)

    def __repr__(self):
        return f"RobotPose({self.x},{self.y},{self.theta})"

    def turn(self, angle: float):
	"""
        Adds angle to theta to represent a turn
        """
	pass

    def move(self, distance: float):
        """
        Updates x and y based on distance and self.theta
        """
        pass
Also add this unit test to the AngleMathTest class in robot_pose.py:
    def test_move(self):
        pose = RobotPose(0, 0, 0)
        for (turn, distance, x, y, theta) in [
            (math.pi/4, 1.4142, 1.0, 1.0, math.pi/4),
            (math.pi/4, 1.0, 1.0, 2.0, math.pi/2),
            (-math.pi/3, 1.0, 1.866, 2.500, math.pi/6),
            (math.pi/2, 1.0, 1.366, 3.366, 2.0*math.pi/3),
            (math.pi/2, 1.5, 0.067, 2.616, -5.0*math.pi/6),
        ]:
            pose.turn(turn)
            pose.move(distance)
            self.assertAlmostEqual(pose.x, x, places=3)
            self.assertAlmostEqual(pose.y, y, places=3)
            self.assertAlmostEqual(pose.theta, theta, places=3)
Calculating a new (x, y) position based on a distance, a heading, and a
previous (x, y) position requires the use of trigonometry. Recall that
for a given angle in a right triangle, the sine of that angle is the
length of the opposite side over the hypotenuse, and the cosine is
the length of the adjacent side over the hypotenuse.
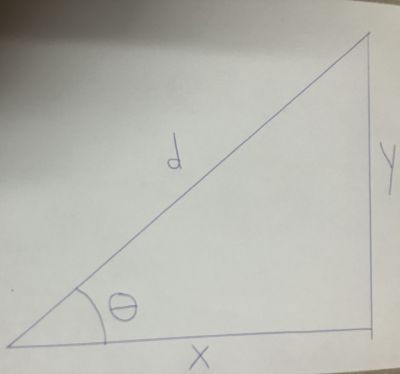
So in the triangle depicted in the image, sin θ = y/d and cos θ = x/d.
Based on this model, use math.sin() and math.cos() to help implement
the move() method. Also implement the turn() method, and ensure that
your solution passes the test_move() unit test. You’ll want to use
normalize_angle_symmetric() as part of your implementation of the turn()
method.
Command-line user interfaces
Create a Python file called curses_demo.py and copy the following
Python program into it:
import curses, traceback

def main(stdscr):
    curses.cbreak()
    stdscr.nodelay(True)
    stdscr.clear()

    counter = 0

    running = True
    height, width = stdscr.getmaxyx()
    while running:
        try:
            k = stdscr.getch()
            if k != -1 and chr(k) == 'q':
                running = False

            stdscr.addstr(3, 5, f"count: {counter}")
            stdscr.addstr(4, 5, f"height: {height}; width {width}")
            stdscr.refresh()
            counter += 1
        except curses.error as e:
            if str(e) != 'no input':
                stdscr.addstr(0, 0, traceback.format_exc())
                stdscr.refresh()

    curses.nocbreak()
    curses.echo()
    stdscr.refresh()


if __name__ == '__main__':
    curses.wrapper(main)
If you are using Windows, type the following line into a command-line terminal
before running this program:
pip install windows-curses
Run the program. Then answer the following questions:
- What does the program do?
- Type the letter
q. What happens?
- Read over the program. Why does the program respond as you observed when
you type
q?
- How does the program work? You need not explain every line, but be sure
to explain the overall control flow of the program, with a special emphasis
on I/O.
- Modify the program so that the counter appears in the middle of the window.
What were the modifications you needed to make to achieve this? Feel free to
remove the line stating the height and width of the window.
Driving a simulated robot
Write a program to display a robot on the screen, allowing the user to move it
around. You may use the structure of curses_demo.py as a starting point. The
program should be named grid_world.py. The program should work as follows:
- Represent the robot’s location using a
RobotPose object. To use the
RobotPose class, include the line from robot_pose import RobotPose at the
top of the program.
- When the program begins, the robot should be displayed as a single character
in the middle of the window, with a heading of 0 degrees.
- The character to use to display the robot should depend on its heading. Use
^, v, <, and > as appropriate.
- When the
a key is pressed, the robot should rotate left by 90 degrees.
- When the
d key is pressed, the robot should rotate right by 90 degrees.
- When the
w key is pressed, the robot should move in the direction it is
facing by one square.
- The robot should not move out-of-bounds - it should stop at the edge.
Programs to submit
robot_pose.pygrid_world.py