Lab 11: Graphics and Animation
Materials
Overview
For today’s lab, download the latest version of
graphics.py.
Open a new Project in PyCharm, and include this
graphics.py file in your directory. You
are now ready to work through the lab.
Step 1: Faces
When we draw on the screen, we first need to
be familiar with the coordinate system. We denote the width as x and
the height as y. Most computer graphics modules
specify that the x, y origin (0,0) is located in the upper-left corner
of the screen, with x increasing to the right and y increasing
downwards, as shown here.
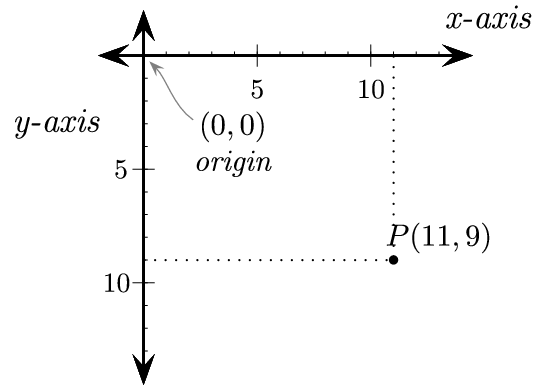
Image source: (http://programarcadegames.com/chapters/05_intro_to_graphics/Computer_coordinates_2D.png)
There are three common shaped we can draw this graphics package: a circle, a
rectangle, and a line. Write the following lines of code in
a Python file called faces.py and execute the program.
from graphics import *

def main():
    win = GraphWin("My First Drawing", 100, 100)

    c = Circle(Point(50, 50), 10)
    r = Rectangle(Point(30, 30), Point(50, 70))
    s = Line(Point(10, 50), Point(70, 60))

    c.draw(win)
    r.draw(win)
    s.draw(win)

    win.getMouse()
    win.close()

main()
You should see an image like this:
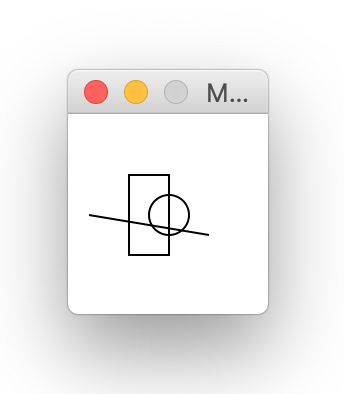
The above program first imports the graphics package, making all
of the objects accessible to the program. Then,
in the main method, a GraphWin object is created, with
a width of 100 pixels, and height of 100 pixels.
Each of the three shapes rely on the Point object, which holds
two coordinates, one in the x dimension, and one in the y dimension.
A Circle is created using a Point for the center, followed
by the radius of the circle. A Rectangle takes two arguments, the
first a Point for the upper-left coordinate of the rectangle, and
another Point for the lower-right coordinate. A Line takes two arguments,
the first Point for the starting x, y coordinate, and the
last Point for the ending x, y coordinate.
After being created, each of the above objects is then drawn to the
GraphWin object to be seen on the screen. Finally, the GraphWin will
wait until the mouse is clicked, then close the window.
Task: Draw a Face
Use Circle, Rectangle, and Line objects to draw a face on the screen. At a minimum, the face should
have
- eyes,
- ears,
- a mouth and
- a nose.
Tip: You can find more shapes, such as an
Oval or
Polygon, described on the
Graphics Reference.
Important: Keep your window size at 100x100 for now,
and make a face to fit in that window. Since your face will be moving around the screen later,
it will help to have a small face.
Step 2: Colors
Three different portions of our drawing can be altered to include colors. Recall
the hexadecimal representation of colors discussed earlier in class, where the
computer understands a color to be composed of three components, Red, Green, and Blue.
Each of the three functions below take a hex string as an argument denoting the color.
The setBackground method of GraphWin objects will paint the whole screen the given color.
The setFill method for a graphics object changes the color to be painted
within the object. The
setOutline method changes the color to use for making
the border of an ellipse or rect.
win.setBackground("#ABCDEF")

c.setFill("#00FFFF")
r.setOutline("#FF0000")
It will be convenient to have some of our basic colors defined in a dictionary.
COLORS = {"black":"#000000", "white":"#FFFFFF",
          "red":"#FF0000", "green":"#00FF00",
          "blue":"#0000FF", "yellow":"#FFFF00",
          "orange":"#FFA500", "hendrixorange":"#F58025",
          "purple":"#9B30FF"}
Task: Add Colors to Your Face
Use the above shapes and color functions, along with any others you might
find useful on the
Graphics Reference
page, to enhance your earlier image of a face.
Note: The first thing to be drawn is covered by the images
that follow. This indicates that the way that images are drawn,
their
Z-order, is based on time.
Step 3: Faces in Space
All of our images so far have been static. To add animations, we need to start
remembering the state of our images and creating methods for how it will change.
The natural way to do this is to create new object, and in particular, we will
be representing Faces floating in space.
We will represent a Face with a class in Python. The face will need to remember
the x,y coordinates for the center of the face. Notice how the draw function
abstracts away the initial face to be centered around any x,y coordinates. This will
let us move the face around the screen. Of course, you should use
your own face-drawing code in place of the example code shown below.
class Face:

    def __init__(self, x:int, y:int):
        self.x = x
        self.y = y
        self.c = Circle(Point(self.x, self.y), 10)
        self.r = Rectangle(Point(self.x - 20, self.y - 20),
                           Point(self.x, self.y + 20))
        self.s = Line(Point(self.x - 40, self.y),
                      Point(self.x + 20, self.y + 10))

    def draw(self, win:GraphWin):
        self.c.draw(win)
        self.r.draw(win)
        self.s.draw(win)
Let’s make our window a little bigger for what is coming next.
Also, we will collect our Face instances in a list
called faces, declared inside main(), add a new
Face to the list, then draw every Face in the list.
def main():
    win = GraphWin("Making Faces", 640, 480, autoflush=False)

    faces = []

    faces.append(Face(50, 50))

    for f in faces:
        f.draw(win)

    win.getMouse()
    win.close()
Try moving your face around the screen by
altering the arguments you use to create the Face in the
setup function.
Task: Multiple Faces
Change the main function to add multiple faces at random locations
around the screen.
Important: Make sure your locations are chosen so that
the face is always completely visible on the screen.
Step 4: Movement
With the faces being drawn by an object, we
can now make these objects move. Add new components to
your Face, called vx and vy, to capture
the velocity of the Face. For now, initialize them to 1, so they will
be moving at a speed of 1 pixel per update, as shown here:
    self.vx = 1.0
    self.vy = 1.0
Next, add a new method to your Face
called update. When called, this function will change the
values of self.x and self.y by the velocity, and
thus simulate movement. Also, make sure that you call the move
method on every object of your face.
def update(self):
    self.x += self.vx
    self.y += self.vy
    self.c.move(self.vx, self.vy)
    self.r.move(self.vx, self.vy)
    self.s.move(self.vx, self.vy)
Finally, inside the main function, add a call to
the update method of each face after calling the
draw method. The rest of your main function will
look like this:
for i in range(1000):
    for f in faces:
        f.update()
    update(30)
Woah, it is moving! This will update the location of the shape 1000 times,
thus moving it around the screen. The update(30) line at the end will keep
the for loop from running more than 30 times per second, which is a decent
frame rate for our animation.
Task: Bouncing
Currently, the faces disappear after a
while, because they moves off the bottom of the screen. We would like
to keep them bouncing inside the window. Add in checks to
the update method of the Face to reverse the appropriate velocity
component when a face hits a wall, by multiplying the velocity in
that dimension by -1.
Task: Random speeds
Abstract the velocities so they are initialized by parameters in
the __init__ method, and augment your setup function to
choose random velocities between -1 and 1 for both the x and y
dimension for each Face created. You should now have faces
moving in all directions and bouncing off of all the walls of the
window.
Step 5: Extensions
Research two of the following extensions on the
Graphics Reference
page and augment your animation above.
Task: Face sizes
Add a size component to
your Face, so you can also initialize
the size. Change your main method and Face to account
for this new size component, and test it out by drawing smaller and
larger faces. Make sure your locations are still chosen so that the
face is always completely visible on the screen!
Make your animations interactive by reacting to input from the
mouse and the keyboard. For example you could have new Faces appear
when and where the mouse is clicked, or you could increase or
decrease the velocity of all the Faces when certain keys are pressed.
Task: Animated faces
Alter your update method of the Face to change the internal pieces of the face
in a cyclic pattern. For example, the face could smile for a few timesteps, then frown,
and then go back to smiling. Or the eyeballs could be moving up and down, left and right.
Task: Face collisions
Right now all the faces pass through each other when they move.
Add a collision detection method, that checks each pair of faces to see if they
are intersecting, and if so, makes the smaller one disappear.
Task: Images
Learn how to import images into your program, and make them move around the
screen as we did with the Face above.
What to Hand In
Important: Make sure you have followed
the
Python Style Guide, and
have run your project through the Automated Style Checker.